Soda Carbonation
Making massive amounts of soda at home is pretty easy — especially if you’re willing to set a few hundred dollars on fire. Hopefully this guide can be useful to somebody else who drinks a lot of soda.
What you need
CO2 cylinder
In general, you’ll want a 5 lb aluminum tank of food-grade CO2 with a CGA-320 outlet. These are pretty standard and easy to find. Larger tanks (e.g., 10 lb) can be purchased too, but they’re also a bit more expensive and annoying to deal with. Steel tanks can be purchased as well, but they’re heavier.
I purchased my CO2 tank from Western Gasco which has various locations around Western Canada. Buying from a gas company can be expensive upfront (mine was $160.50 in 2023), but the advantage is that I can have it exchanged for $27 at any location, and the gas company deals with the tank maintenance.
I would also strongly recommend using a fire extinguisher mounting bracket to mount the cylinder to the wall. Otherwise, it’s pretty easy to accidentally knock over the cylinder and break something, and it can be a bit annoying to access on the floor. I used this one, but any bracket for 5 lb extinguishers should have the right dimensions.
CO2 regulator
You should look for a dual-stage CO2 regulator designed for a CGA-320 valve that can pressurize to 60 PSI. It should also have a 5/16” barbed outlet and a shut-off valve. Again, these are pretty easy to find. The one I use is a Taprite 3741-BR.
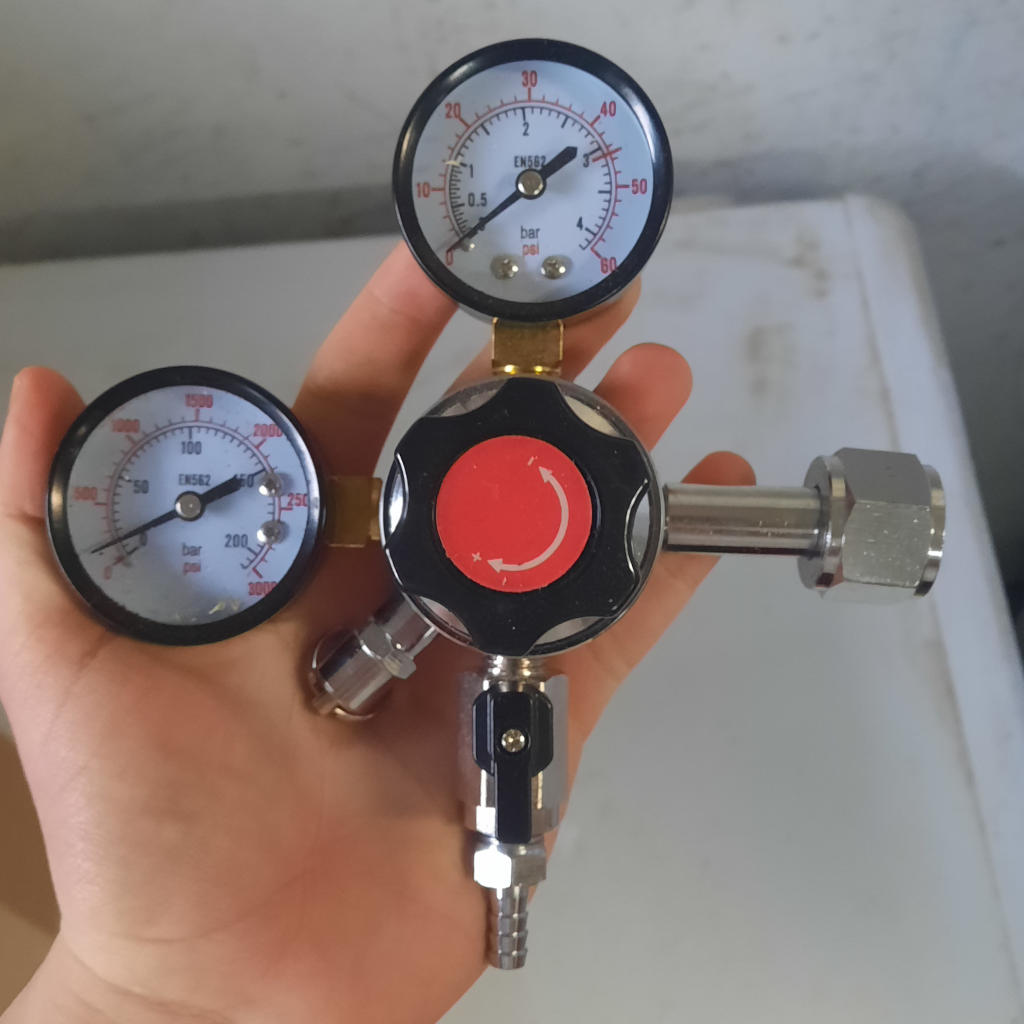
The two well-regarded brands are Taprite and Micro Matic. Micro Matic actually acquired Taprite back in 2023, so I suppose they’re the same company now. There are also a few regulators on Amazon that are significantly cheaper ($50 CAD instead of $140 CAD).
In my experience, the benefits of a Taprite regulator over a cheap one are that it’s much easier to get a proper seal, it’s serviceable if it breaks, the gauges are actually accurate, and the pressure is more consistent. Honestly though, the Amazon ones are probably more than good enough for most people. Just be aware that they have a more limited lifespan, and you might need a nylon CGA-320 washer to get a proper seal.
CO2 wrench
A CO2 wrench is a tool that’s used to tighten the seal between the tank and the regulator. The Taprite 740-18NB is an example of this.
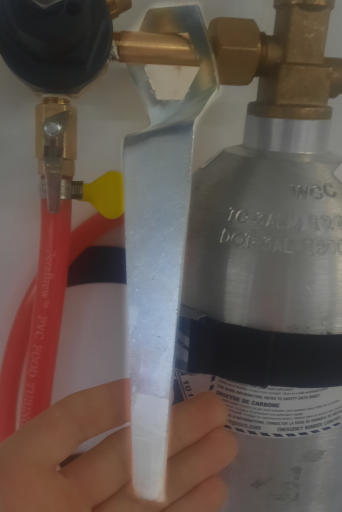
This isn’t necessary, especialy if you already have a wrench. However, I still recommend getting one because they’re way more convenient to use, and they’re pretty cheap.
Food-grade tubing
Besides length, you also need to care about the inner diameter (ID) of your tubing. Specifically, the inner diameter of your tubing needs to match the diameter of the barbed outlet on your regulator — most likely 5/16”. The outer diameter (OD) doesn’t really matter unless you’re using push-in fittings. The tubing I use has an inner diameter of 5/16” and an outer diameter of 9/16”.
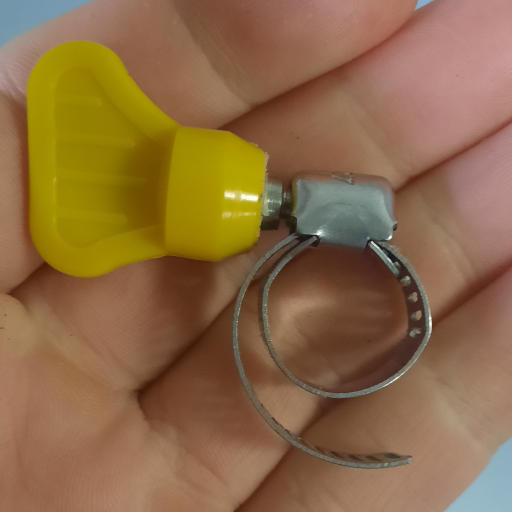
In addition, you will need hose clamps to keep the hose tightly cinched against the regulator and prevent gas from leaking. (Keep in mind we’re going to be pressurizing the line!) I’d suggest looking for butterfly hose clamps because they’re way easier to adjust than screw hose clamps. Additionally, the diameter of the clamp should be close to the outer diameter (OD) of your tubing.
Although it’s optional, I’d also suggest getting a tubing cutter. These make it much easier to cleanly cut your tubing. Otherwise, if it doesn’t sit flush against the regulator body, it can leak CO2.
Ball lock disconnect
You’ll want a ball lock gas disconnect. Ensure that it’s actually meant for gas, it’s actually ball lock, and that its barb matches the inner diameter of your tubing. Some disconnects also have replaceable barbs that can be screwed on using a swivel nut.
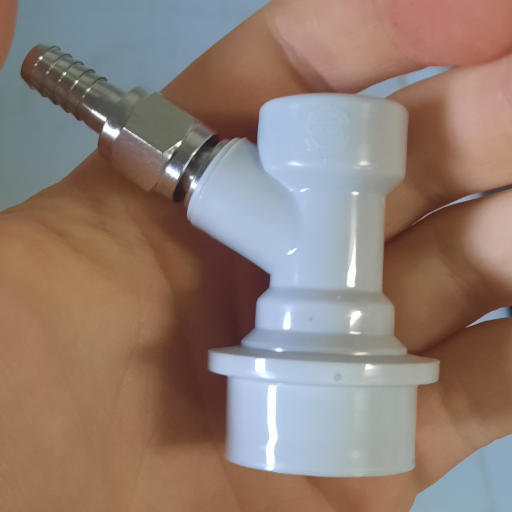
The main brand that makes these is CMBecker. However, at least in my experience, the ones from Amazon work just as well. Just make sure that it has the right specifications.
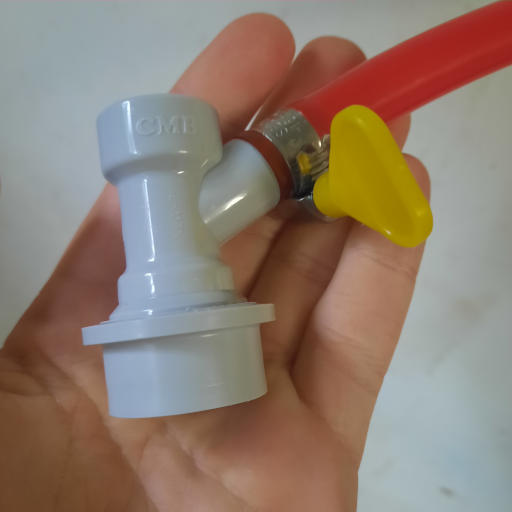
Carbonation cap
A carbonation cap is just a bottle cap that has a ball lock fitting. This is what you put on a bottle to carbonate it.
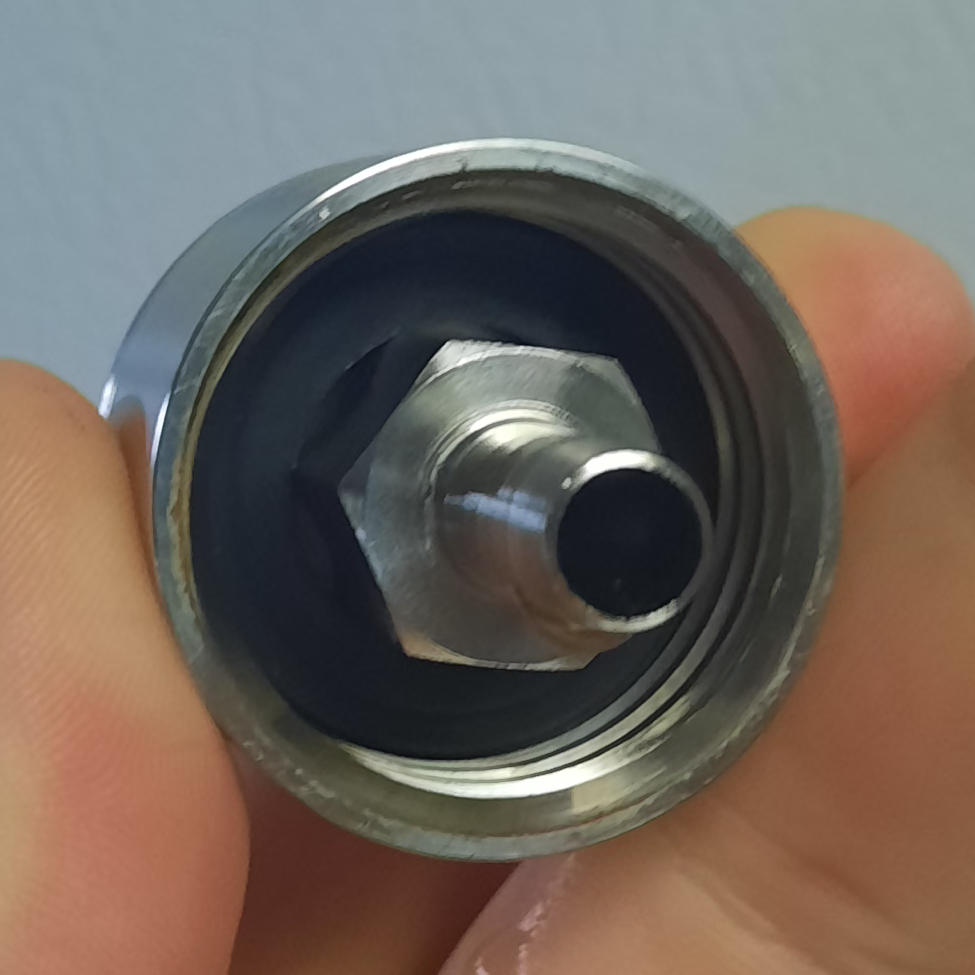
There are a lot of carbonation caps for sale online, but I’ve found that many of them leak — either when connected to the gas line or slowly over time after the carbonation is complete. I’d suggest looking for models with washers on the bottom (as shown above) and large O-rings. The “Watflow” caps on Amazon have worked well for me, but the other well-reviewed brands will probably work too. I’d suggest buying multiple caps so you can carbonate multiple bottles at once and store them for later.
Empty bottle
Just buy a 2L bottle of soda, drink the soda, and clean the bottle.
Soda syrup
If you want to flavour your soda, you’ll need syrup. There are bulk suppliers you can use, or you can buy a bottle of Soda Stream syrup from your local store. I personally recommend the artificially sweetened syrup because the resulting soda is less sticky, and it’s probably healthier too.
For what it’s worth, I find that I can make 10 2L bottles of soda from each of the flavour bottles that SodaStream sells, and they generally cost $7-8 CAD per bottle when they go on sale on Amazon, so using those would add roughly $0.80 to the cost of each bottle.
Equipment review
This is the full list of everything you’ll need.
- CO2 cylinder
- CO2 regulator
- Nylon washer (depends on regulator)
- CO2 wrench (optional)
- PVC tubing
- Hose clamps
- Tubing cutter (optional)
- Ball lock disconnect
- Carbonation cap
- 2L soda bottle
- Soda syrup (optional)
There are kits available with the required parts; e.g., this one from Ontario Beer Kegs is $190 CAD that has everything but the tank. There is also this one from Amazon available for $56 CAD that has everything but the regulator and tank. All of this stuff will cost roughly $200 - $350 CAD (before shipping + taxes) depending on where you look and what equipment you choose.
This is a high upfront cost, but each 5 lb tank can carbonate at least 100 bottles, and tank exchanges are $27 CAD, so it works out to roughly $0.27 CAD per bottle. If your household consumes two or three bottles daily, this is actually pretty economical. Bottles of club soda are $1.48 each in my area, so this saves roughly $1.21 per bottle and ~$72.60 per month assuming two bottles per day are consumed. At that rate, the equipment pays for itself after a few months assuming that no soda syrup is used.
For comparison, SodaStream machines have a lower upfront cost of $170. However, a 0.9 lb SodaStream cylinder costs $20 to exchange, so that’s $111.11 per 5 lbs of CO2. There are third-party companies that refill the cylinders, and there are third-party tank adapters you can buy, but in my opinion, you might as well buy the proper equipment at that point.
Assembly
- Install the hose on the CO2 regulator
- Slide the clamp on the hose
- Slide the hose over the barb until it’s flush with the regulator
- Put the clamp in position and tighten it
- Attach the ball lock disconnect to the hose
- Slide the clamp on the hose
- If your disconnect has a screw-on barb, attach it
- Slide the hose over the barb until it’s flush with the disconnect or nut
- Put the clamp in position and tighten it
- Screw the regulator into the cylinder
- If neither your regulator nor tank have an O-ring, you’ll need to put a nylon washer between the tank and regulator
- If you have a CO2 wrench, you should put it around the shank before attaching the regulator
- Ensure the regulator does not rotate as you screw on the nut
- Make sure the connection is tight, but don’t strip the threading
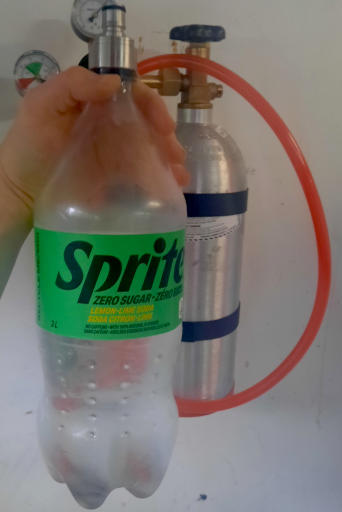
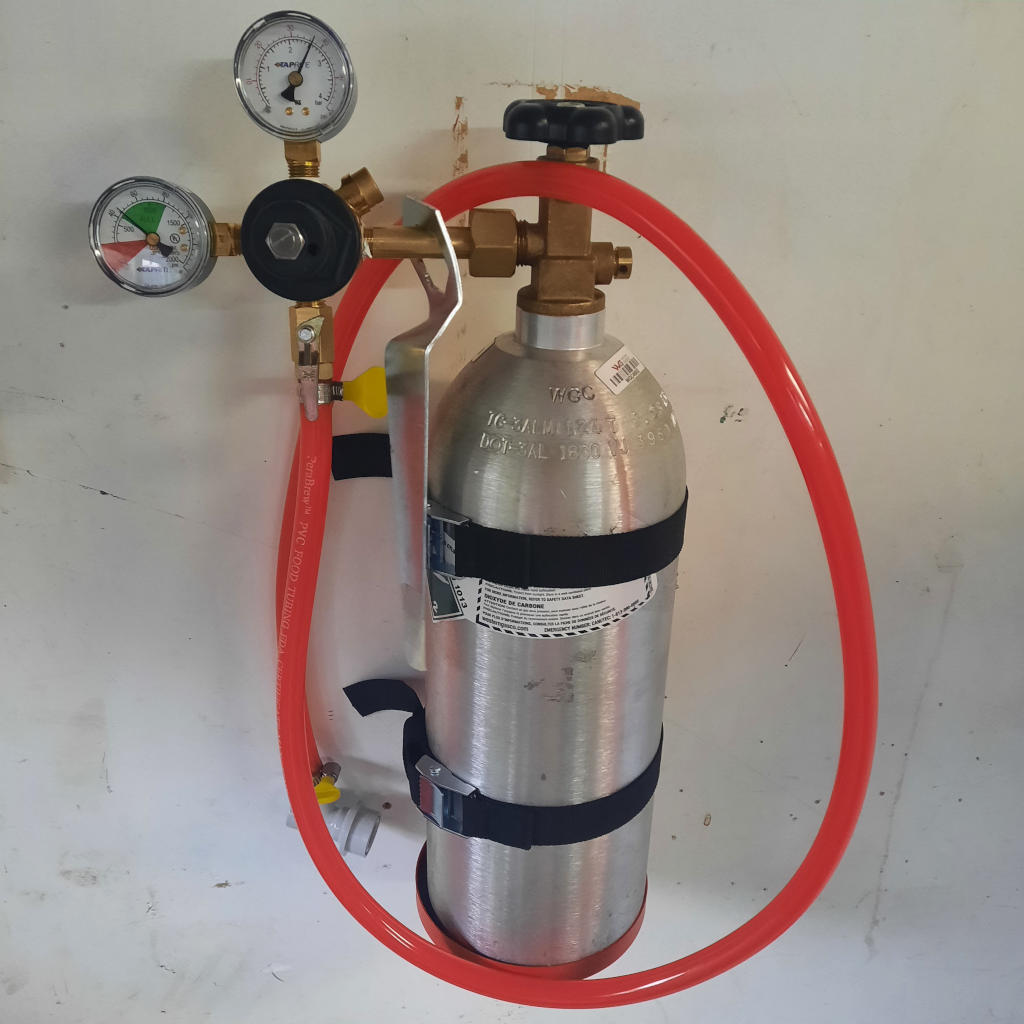
At that point, you should have something resembling the system below.
The last thing to do is to open and close the valve on the tank briefly to make sure everything works.
Checking for leaks
- Close the valve on the regulator
- Open the valve on the tank then close it once the high-pressure needle moves up
- Leave it for an hour
- If the high-pressure needle went down, you have a regulator / tank leak; otherwise continue
- Open the valve on the regulator
- Leave it for an hour
- If either of the gauges drop, you have a hose / regulator leak; otherwise you’re good!
If there’s a regulator / tank leak, you might need to tighten the connection more or try another washer. You might want to check the surface of the tank for defects or, if all else fails, replace / rebuild the regulator.
If there’s a hose / regulator leak, you might need to tighten the clamps, make sure the hose is cut flat, and make sure the hose is flush to the fittings on both sides.
Fixing leaks is a huge pain, so you may need to fiddle around for a while to find the cause. That said, if your assembly passed the checklist, you should be fine.
Choosing what to carbonate
In general, if you can blow bubbles in a liquid, you shouldn’t carbonate it. Otherwise, when you open the cap, the liquid will bubble out of the bottle like a science faire volcano experiment and make a mess all over the place.
For example, wine, lemonade, juice, and cider can all usually be carbonated. However, milk, smoothies, beer, etc. usually shouldn’t be. Baileys apparently turns into custard when carbonated.
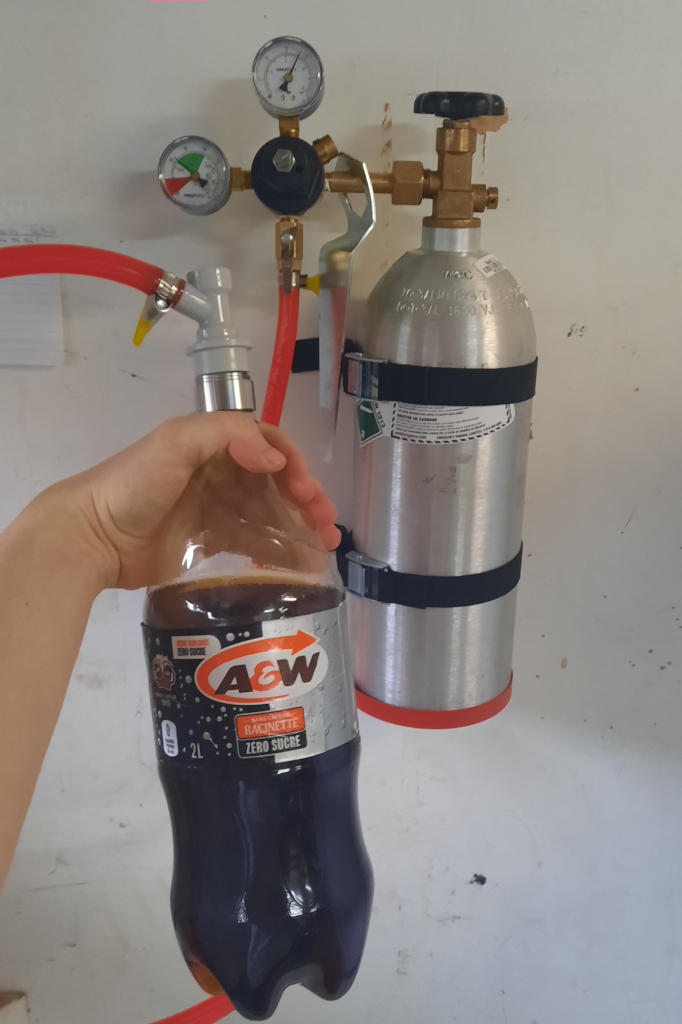
Carbonating a bottle
- Fill the bottle ~2/3 with water. The colder the better.
- If you’re using syrup, you should add that as well
- The instructions may say to add the syrup after carbonating, but it’s more convenient to do it before. Just make sure that you clean your gas line and fittings occasionally. (I do it every refill.)
- Squeeze out the excess air and screw on the carbonation cap
- Open the valve on the tank and close the valve on the regulator
- Set the tank to 20-50 psi.
- 40 psi is generally the sweet spot IMO
- Connect the carbonation cap to the disconnect
- The air from the gas line will likely fill the vacuum in the bottle.
- Slowly open the shut-off valve on the regulator until the bottle is pressurized
- Shake the bottle for a minute or until it stops
absorbing CO2
- Low-quality carbonation caps might leak if you do this, so keep an eye on it
- Take off the carbonation cap and close the valve on the CO2 cylinder
At this point, you should now have a bottle of carbonated soda.
Maintaining carbonation after opening
To prevent soda from going flat after opening it, the best you can do is to close the cap quickly to prevent all the CO2 from escaping.
There are products like the Fizz-Keeper that can repressurize soda bottles. It’s a really nifty gadget, but gas solubility is based on partial pressure (i.e., the pressure of just the CO2 disregarding other gasses), so that doesn’t work.
I’ve also heard claims that squeezing all the air out of the plastic bottle helps too, but in my experience, the bottle just returns to its original volume as the remaining CO2 gets pulled from the carbonated liquid to fill the vacuum.